|
Data Entry and
Search Form
Screen as seen in Access 2010
Runtime
Note: The Acrobat
Options may or may not be seen on
the menu bar
It probably
depends on which version of Acrobat
is installed on your computer.
This does not
affect the functions of this program
however.

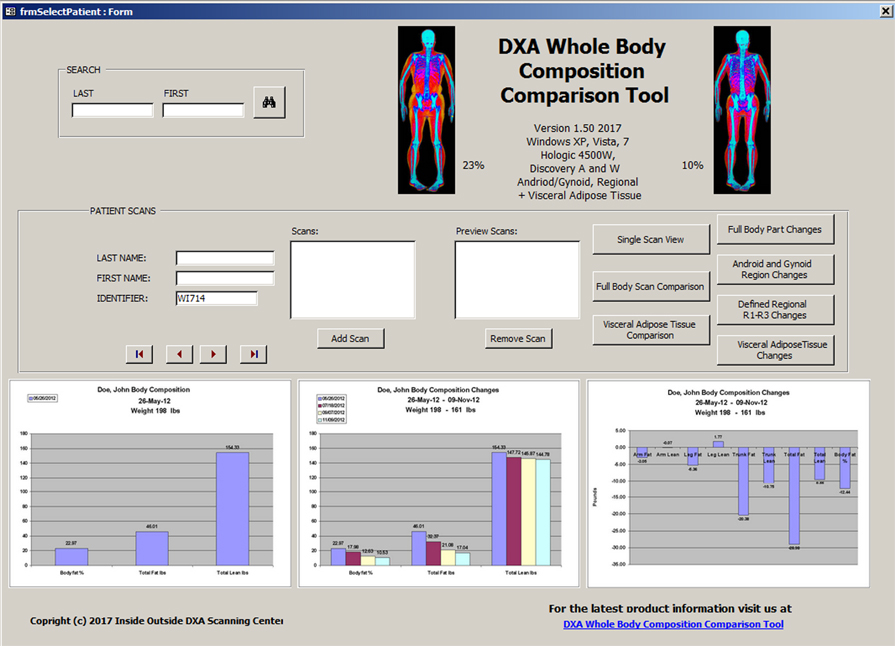
This is the Data
Entry and Search Form after it is
opened by Access 2010 Runtime or a Full
Version of Access. The "LAST" and
"FIRST" entry boxes will be blank.
There may be an entry in the "LAST
NAME" box (usually 10" thick scan),
or the "IDENTIFIER" which will be the first record in
your PatScan.mbd database. This
indicates the program has found your
database based on the directory path
you have provided us.
Data Entry and
Search Form
Screen as seen in Access 2010
Runtime with Data Entry

It is
best to put the first 2 or 3 letters
of the "LAST" and "FIRST" Name boxes (upper or
lower case) and then
Click on the Search Button.
The tool searches well with just the
"LAST" name entry but not just the
"FIRST" name. The program will search PatScan.mdb
and give you the first entry in the
database which matches the letters
you have entered. If
you have several clients with the same
letters use the forward arrow button to
find the record you want. In
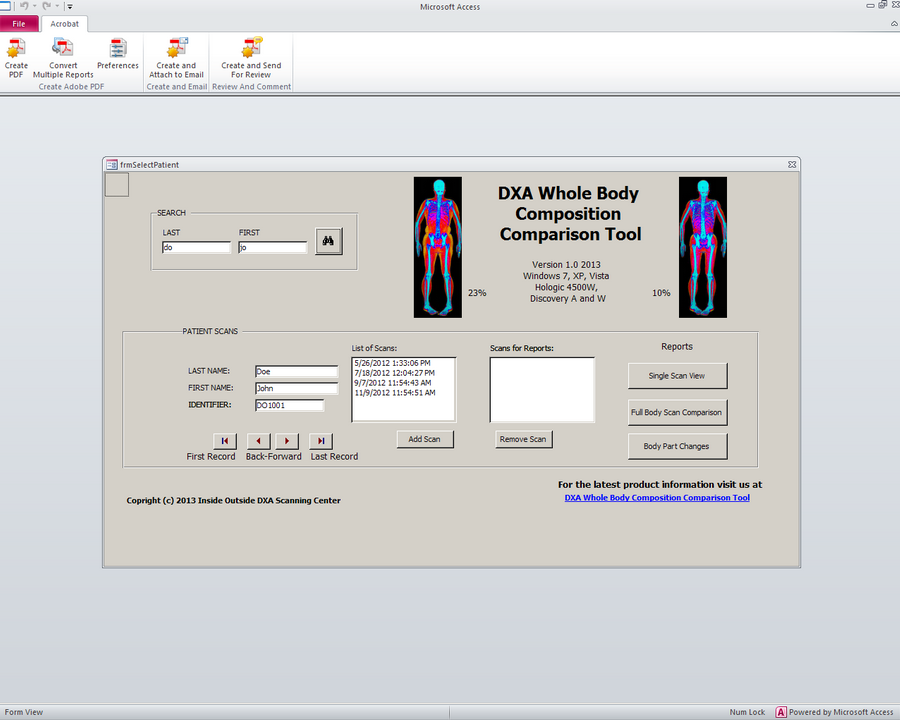
the example we typed "do" for
"LAST"
and "jo" for "FIRST" and the search
yielded Doe, John and his
"IDENTIFIER", DO1001. In the
"List of Scans:" box
all the Whole Body DXA Scans are
listed by date, earliest on top and
latest at the bottom. In the
example, Doe,
John has 4 scans. You then select a
scan and click the "Add Scan" Button
and it appears in the "Scans for
Reports:"
box. Continue to select and "Add
Scan" depending on
the type of report you want. If you
want a"Single Scan View" Report, only pick one
scan, if you pick two scans and you
try to do a "Single Scan View" Report, you
will get an error message. For the
"Full Body
Scan Comparison" Report, you should
select 2
up to 10 Scans. They do not have
to be in chronological order as the
"Full Body Scan Comparison" Report will sort them by date. The
"Body Part Changes"
Report requires 2
Scans to be chosen. To remove
a scan from the "Scans for Reports:"
box,
select the scan and Click the
"Remove Scan" button.
After selecting the report desired
the Access Print Preview window will appear
with one of the graphs below. Click
on the Print icon to print and then
on the Close Print Preview option to return
to the Data Entry and Search Form to
design and select a different report!
Alternate Search
Method

If you leave the "LAST"
and "FIRST" boxes empty there is an
alternate way to find a client or
just scroll through the PatScan.mdb
database. On first opening the
Data Entry and Search Form, the first record in
your database is indicated in the
"LAST NAME" box (usually 10"
thick scan). The Alternate
Search Method is is to simply use
these arrow keys. The first arrow
button will
take you to the first record in the
database (usually 10" thick scan), the forward and back arrow buttons allow
you to advance through the database
alphabetically by Last Name one at a
time. As you
display each client, their scans are
displayed in the "Scans for Reports:" box.
You can create reports for an
individual client as their scans are listed.
The last arrow
takes you to the last record in the
database. |
